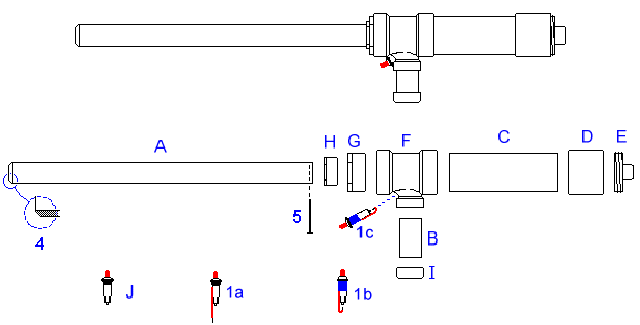
The 150 Cal. Idaho Spud Cannon


   Part  Qty.    Item:
      (A)     1      1-1/2" ABS Pipe, between 24" and 28" long
      (B)     1      1-1/2" ABS Pipe, 3-1/2" long
      (C)     1      3" ABS Pipe, between 8" to 10" long
      (D)     1      3" ABS Cleanout Adapter
      (E)     1      3" ABS Cleanout Plug
      (F)     1      3" x 3" x 1-1/2" ABS Reducing Tee
      (G)     1      3" x 2" ABS Reducing Bushing
      (H)     1      2" x 1-1/2" ABS Reducing Bushing
      (I)     1      1-1/2" ABS Pipe Cap
      (J)     1      Standard Gas Barbecue Grill Piezoelectric Ignitor
                      (this can usually be purchased in a hardware
                       store as a replacement part for gas barbecues.)
                     6" Piece of Insulated Wire
                     Electrical Tape
                     ABS Plastic Pipe Cement
                     Silicone RTV Sealant
1a. Wrap the 2-1/2" long bare end of the wire around the side of the piezoelectric ignitor. The wire should be in contact with the piezoelectric ignitor's side contact wire. Secure with electrical tape, with the remaining end of the insulated wire protruding out alongside the "sparkplug" end of the piezoelectric ignitor.
1b. Bend the 1/4" bare end of the insulated wire back in a "J" shape toward the end contact on the piezoelectric ignitor. Bend the wire so there is approximately a 3/8" gap between the end of the wire and the end contact on the piezoelectric ignitor. Test the ignitor by pushing the button to make sure you have a consistant strong spark across the "sparkplug" gap.
1c. Drill a hole where indicated on the side of the 3" x 3" x 1-1/2" ABS Reducing Tee, which is just barely large enough for the piezoelectric ignitor to be inserted all the way up to the shoulder on the ignitor. This will be the spud cannon's "trigger".
2. Use silicone RTV sealant to completely coat and water proof the sides of the piezoelectric ignitor, being careful not to get any into the sparkplug end of the ignitor. Insert the ignitor into the hole in the ABS Reducer Tee until its shoulder is flush against the tee, and add more silicone RTV sealant inside the Tee all the way around the ignitor. Check to make sure that the sparkplug gap is still O.K., and set this piece aside to cure for AT LEAST one full day.
3. After the silicone RTV has cured for at least one full day, add more silicone RTV inside the tee if necessary to ensure that the trigger is strongly secured into the tee.
4. Use a file or sanding block to chamfer one end of the long 1-1/2" ABS pipe "barrel" as shown. This will make it easier to push potato plugs into the barrel.
5. Cut a nail or other stiff wire into a piece 1-13/16" long. Drill two holes, the same diameter as the nail, across from each other 1/4" in from the back (un-chamfered) end of the barrel. Insert the nail through the holes across the end of the barrel as shown. This will prevent potato plugs from being pushed too far down and out the back of the barrel.
6. Use the ABS cement to glue all the ABS plastic pipe components together EXCEPT for the screwed 3" cleanout plug, which needs to be removable.
1. Screw out the 3" pipe plug from the back end of the Spud Cannon, and blow out any fumes from the previous shot.Materials Required-
(1) 150 Cal. Idaho Spud Cannon (1) Wood Stick or Dowel Ramrod, 2-1/2' to 3' long (1) 10 lb Bag #2 Idaho Russets (1) Can Aquanet Hair Spray (Regular Hold works fine.)Directions-
2. Push a potato over the beveled end of the barrel to core out a 1" to 2" long potato plug into the barrel. Use the wood ramrod to push the potato plug all the way to the back of the barrel.
3. Hold the 3" pipe plug partially over the back opening of the spud cannon and spray a 1 second burst of hair spray into the back of the 3" pipe chamber. Quickly move the 3" plug over the opening and screw it back in place.
4. Aim the spud cannon and squeeze the trigger to fire. Remember to blow out all the fumes before the next shot.
These plans show the spark gap located on the back of the piezoelectric ignitor at the front of the combustion chamber. This causes the fuel/air mixture to ignite there first, and the combustion byproducts blow the potato out of the barrel with kind of a "FOOOMP" sound, while the residual fuel/air mixture continues to burn inside the gun. The spud cannon acts as a muffler, suppressing the combustion flash and some of the sound.
If the spark gap is moved inside toward the back of the combustion chamber, when the fuel/air mixture ignites there it blows the potato and the last of the burning hair spray out of the barrel. All of the residual combustion occurs outside of the gun, creating a bright blue muzzle flash at night, and a reasonable "BANG".
Either of the above methods will launch the potato about the same distance. However, if you want more "kick" and longer range, move the spark gap to the middle of the combustion chamber. The flame starts there and burns both directions at once inside the gun, effectively doubling the burn rate and combustion pressure. The potato will come flying out with a sharp "CRACK", sounding like it's been launched from a shotgun.
A few hints on using wires to move the spark gap. Use wire with good insulation. Run the two wires separately at least 3/4" apart inside the gun, until you bring them together for the spark gap. Do not twist the insulated wires together or the spark will short through the insulation between the wires before it will fire across the spark gap. You can hold the wires and spark gap in place inside the gun with Silicone RTV.
Have fun and shoot safely!